

Before any image development took place, care was taken to acquire copyright clearance from the publishers of the art historical publication which contained a comprehensive photo documentation of the tomb of Sen-nedjem; Das Grab des Sennedjem, by Abdel Ghaffar Shedid (1994). This was necessary to avoid any legal disputes that could result from the unauthorised use of published images. Thanks are expressed to Verlag Philipp von Zabern for allowing these images to be used in this project. All copyright remains with the owners.
One of the features of VRML is that it allows images to be 'texture mapped' onto surfaces, meaning photorealistic models should be created. Usually this involves using small images that are tiled over a larger area to give a repetitive surface. This cuts down on file size and therefore rendering time, and if images are carefully constructed it appears little or no repetition has occurred. In the model, it was decided to try and make the tomb complex as realistic as possible. This then involved two procedures; small images for the application of textures such as stone, sand and grit and, where possible, larger images to make the painted barrel-vaulted chamber as photorealistic as possible. Although images used in texture mapping are generally small, it was decided to produce an optimum model of the tomb using large images derived from Das Grab des Sennedjem. This would test the boundaries of the facilities provided by VRML, the competency of the world builder package, and the ability of CosmoPlayer to cope with large photorealistic images. If archaeological reconstructions are to become more realistic, VRML and its browsers should be able to cope with large image file sizes.
To retain some kind of authenticity, the smaller texture images were created by scanning pictures of the site as it exists today, and taking samples of the dirt, sand and stone found at the tomb site (figures 14 and 15). These were scanned at 75 points per inch, the Internet standard, using Fotolook and Adobe PhotoShop. They were adjusted and manipulated in PhotoShop to create tiling textures with an average file size of 10k.
Figure 14: Image files created from photographs of the site used to add texture to the model.
These are used to create sand, stone and dirt textures. They were carefully created so that the fact the image repeats is not apparent.


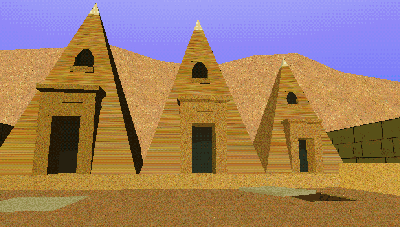
Figure 15: A view of the tomb complex from inside the courtyard.
This shows the use of the image textures to give the background and courtyard ground their texture. Unfortunately, because of the triangular shape, the image mapping does not work very well on the pyramids, giving the stripy appearance at the front.
Preparation of the larger images was much more complex. As each wall surface in the inner tomb was covered with individual frescoes, the tiling mechanism available in VRML was not applicable, and so images had to be prepared which would cover each wall surface fully. This took a long period of trial and error to complete.
The first issue confronted was the resolution and size of the images needed to cover such a large virtual area. Again, it was decided that the optimum model required photorealistic surfaces, and accordingly much investigation had to be carried out to ensure the images applied to the wall surfaces did not pixelate or distort when viewed in place in the tomb. VRML browsers allow the user to 'zoom in' to surfaces, and because each wall painting contained so much detail, it was important that this manoeuvre did not produce a pixelated unintelligible mass of colour when the images were viewed at close range. After much trial and error, it was discovered that the minimum resolution needed for the wall surfaces was 150 points per inch when the images were scanned to 100% scale. This resulted in a file size of over 2 MB for each wall surface (in index colour mode), and although various attempts were made to decrease the file size, this size of file was required to ensure the visibility of the tomb paintings in the computer model.
There were also problems with the photographs themselves, including the technique used to take the photographs and the size of the images. The tomb, being underground, is of course dimly lit. In the photographs, instead of a diffused light being used to illuminate the surfaces, there is much evidence of flash photography that causes discoloration over different parts of the image. This is not really a problem when the images are destined for a coffee-table type book, but when placed together in the virtual tomb the unsuitable lighting of the images became all too obvious. Some were overly dark, some too light, and larger images with two or more panels showed that the colours within the paintings were different between separate images. Eventually, scanning techniques were employed to try and eradicate this problem. A Gamma tone curve of between 1.2 and 1.8 was applied to different images, and PhotoShop was relied on to blend in different areas of lighting and colour.
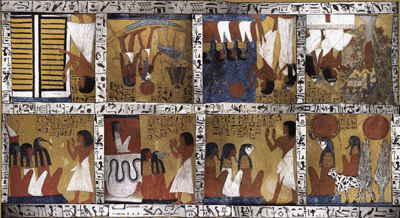
The mapping of the images was not a straightforward scan and apply process either. Many of the walls were photographed in two or more segments, and the roof was recorded by a series of ten images (figure 16). This required that a composite image for each surface be constructed using PhotoShop, giving a roof, right wall, left wall, long lower wall, two shorter lower walls, and eight images for faces surrounding and on the door. This involved much work.

Figure 16: The composite roof image.
This consists of eight main panels and many fragments of hieroglyphs that were laboriously pieced together in PhotoShop to create the whole representation of the roof that is overlaid onto the bare model.
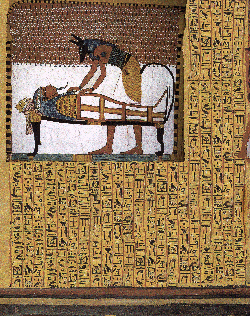
It was also discovered that some surfaces on the tomb had not been photographed. At least half of the hieroglyphic inscriptions had been cropped out of the photographs. One whole panel, the hieroglyphs regarding the book of the dead beneath the image of Anubis and the mummy (figure 17), was missing. Edges of panels were missing, and often details of the images had been cropped too. When trying to piece together the panels, then, an archaeological issue became apparent. The missing areas of the tomb could either be left blank, giving the most accurate but not convincing model available from the sources available, or recreated using techniques in PhotoShop, resulting in a model which gave the impression of the tomb as it would have been (fully covered in wall paintings), but which surrendered some archaeological integrity. It was decided to go for the latter, because the tomb had been fully covered with images, and as an educational model this would give the best impression of the structure of the tomb, rather than having missing strips throughout. However, any missing areas such as hieroglyphs were copied from other areas in the same tomb to retain a semblance of archaeological integrity. (There was a major attempt to find an image of the hieroglyphs beneath the image of Anubis and the mummy. Even with the help of the Oxford Topographical Bibliography staff, only a poorly grained black and white image was acquired which proved unsuitable for the purposes of the model. This area, again, was constructed using areas of hieroglyphs from other parts of the tomb - figure 17.)

Figure 17: The reconstructed hieroglyphs beneath Anubis and the mummy.
Although some repetition is evident in the hieroglyphs, it was considered that it was necessary to try and reconstruct the panel to blend with the rest of the model rather than leaving it bare. The hieroglyphs were taken from other parts in the same wall.
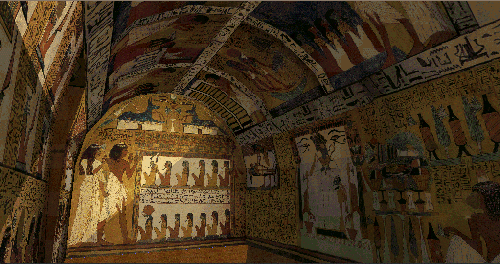
These images were then mapped onto the surfaces of the tomb. After much trial and error, a more realistic final model was thus created. However, the major drawback with using such large images was the time taken to render the model. Once loaded, the browser copes admirably with the large images, allowing smooth movement within the tomb. Unfortunately the model takes five minutes to render, even running from the C drive on the authoring platform. A further attempt was made at file size reduction, but this caused great distortion to the images. Comprehensive views of the model can be seen later. Figure 18 shows a view from inside the inner tomb.

Figure 18: A view of the inner chamber of the tomb model.
This illustrates the left wall, the barrel-vaulted ceiling and the lower long wall. The viewer is standing just in front of the entrance to the chamber. The two large figures illustrated on the wall are that of Sen-nedjem and his wife Eineferti.
© Internet Archaeology
URL: http://intarch.ac.uk/journal/issue7/terras/images.htm
Last updated: Mon Nov 29 1999